Home
admin
|
Gestion d'une infra vSphere 5 October 18th, 2016 |
|||||||||||||||||||||||||||||||||||||||||||||||||||||||||||
Calculer l'espace provisionné par VM et par datastore Déplacer un modèle Clone vs template Analyse des logs Et sans vcenter, on fait comment ? vmxnet3 Pas de redondance réseau Messages d'erreur Client lourd vsphere en anglais Raw Device Mapping (RDM) Mises à jour des hotes Mises à jour des MV SSH Manips en ligne de commande Augmenter la taille d'un disque persistant VMware Linked Cloning technology Serveur vcenter Serveurs view-connection Difference between the terms Reset, Refresh, Recompose and Rebalance
On calcule l'occupation disque en multipliant la taille d'un secteur (512) par le nombre de secteurs (c*h*s cf ci-dessous) puis en divisant par 1024*1024*1024 pour passer en Go. The sector count is determined by multiplying the number of cylinders, heads, and sectors. The number of cylinders, heads, and sectors are defined in the DDB section. Source : https://kb.vmware.com/selfservice/microsites/search.do?language=en_US&cmd=displayKC&externalId=1026266
Comment déplacer un modèle ? (le bouton migrer n'est pas disponible) "Convert it to a virtual machine (right click on guest and choose the appropriateoption), move it via the migrate function (right click on guest and choose "Migrate") and convert it back to a template (right click on guest again and choose to convert it back to a template)." Source : https://communities.vmware.com/thread/213891?start=0&tstart=0
Source : http://robertparten.com/vmware-difference-between-clone-and-template/
Source : http://kb.vmware.com/selfservice/microsites/search.do?language=en_US&cmd=displayKC&externalId=1017939#composerserver "VMware Technical Support routinely requests diagnostic information from you when a support request is addressed. This diagnostic information contains product specific logs and configuration files from the host on which the product is run. This information is gathered using a specific script or tool within the product." View Composer Server
postulat : la MV (qui peut etre un vcenter) est arrêtée sur un esxi quelconque qui lui aussi est arrêté
Lors de la création d'une MV Linux, il ne m'est pas possible de sélectionner un adaptateur réseau de type vmxnet3 (qui sont préconisés pour de meilleures performances). Solution : passer le type de ma MV de "Autre Linux (64 bits)" à "Autre Linux 2.6.x (64 bits)"
Problème de configuration : cet hôte n'as actuellement aucune redondance réseau solution : 1/ mettre l'hote en maintenance 2/ supprimer le commutateur standard chargé du vmotion (cf configuration > Mise en réseau) 3/ ajouter la carte réseau anciennement utilisée par le vmotion dans le vswitch du réseau de management 4/ recréer le vmotion dans le vswitch du réseau de management
ou en francais : "Initiation dune action de basculement de la machine virtuelle par vSphere HA dans le cluster xx du centre de données xx" Solution : désactiver HA puis le réactiver. Source : http://kb.vmware.com/selfservice/microsites/search.do?language=en_US&cmd=displayKC&externalId=2004802 Solution :
Sources La Solution : Make sure that the pool where the vm is located, does not have provisioning enabled. Connect to the composer and browse toC:Program Files (x86)VMwareVMware View Composer, open a command prompt and run : SviConfig -operation=RemoveSviClone -VmName=VMname -AdminUser=TheLocalAdminUser -AdminPassword=TheLocalAdminPassword -ServerUrl=TheViewComposerServerURL If the vm is still there: Connect to the connection server and open adsiedit.msc Log in to one of the View Connection Servers as Domain Administrator. Click Start > Administrative Tools > ADSI Edit. In the console window, right-click ADSI Edit and Click Connect to. In the Name field type: View ADAM Database Select Select or type a Distinguished Name or Naming Context. In the field below Select or type a Distinguished Name or Naming Context, type: dc=vdi,dc=vmware,dc=int Select Select or type a domain or server. In the field below Select or type a domain or server, type: localhost:389 Click OK. Click View ADAM Database [localhost:389] to expand. Click DC=vdi,dc=vmware,dc=int to expand. Right-click the Connection View ADAM Database [localhost:389], and click New > Query. Under Root of Search, click Browse and select the Servers organizational unit. Click OK. In the Query String, paste this search string: (&(objectClass=pae-VM)(pae-displayname=VirtualMachineName"> Where VirtualMachineName is the name of the virtual machine for which you are trying to locate the GUID. You may use * or ? as wildcards to match multiple desktops. Click OK to create the query. Click the query in the left pane. The virtual machines that match the search are displayed in the right pane. Record the GUID in cn=<GUID>. Delete the pae-VM object from the ADAM database: Locate the OU=SERVERS container. Locate the corresponding virtual machine's GUID (from above) in the list which can be sorted in ascending or descending order, Select Properties and check the pae-DisplayName attribute to verify the corresponding linked clone virtual machine object. Verify and delete the pae-VM object. "However, whether running, suspended, or shutdown, I am not able to increase the disk size. The option is greyed out, as you can see below. What am I missing?" Solution : supprimer les snaps associés à la machine... Source : https://communities.vmware.com/thread/272616
Pour disposer du client lourd sphere en anglais (il est pratique en cas de soucis de disposer des messages d'erreur en anglais)
Il est parfois nécessaire de créer des machines virtuelles ayant des disques qui écrivent directement sur les LUNs sans passer par des fichiers vmdk. C'est le cas par exemple des machines demandées pour faire des tests de performance cf "best practices for performing a storage performance test" http://kb.vmware.com/kb/2019131 Pour se faire, dans la config de chaque esxi il faut analyser les nvx périphériques de stockage mais pas les ajouter (l'utilisation impose un formation vmfs-3 ou 5). L'utilisation se fera ensuite directement dans la config des VM.
Les mises à jour des hotes sont grandement facilitées par l'installation dans vsphere du plugin "update manager". (
Source : http://kb.vmware.com/selfservice/microsites/search.do?language=en_US&cmd=displayKC&externalId=1002866 To disable these warnings using vSphere Client: Select the ESXi host from the Inventory. Click the Configuration tab. Click Advanced Settings in the Software menu. Navigate to UserVars > UserVars.SuppressShellWarning. Set the value from 0 to 1. Click OK. Source : http://kb.vmware.com/selfservice/microsites/search.do?language=en_US&cmd=displayKC&externalId=2003637
To power on a virtual machine from the command line:
Note: The first column of the output shows the vmid.
Source : http://kb.vmware.com/selfservice/microsites/search.do?language=en_US&cmd=displayKC&externalId=1038043
il faut suivre séquentiellement ces étapes : vcenter-view > inventaire > VM > click droit sur la VM > Modifier les paramètres > disque dur ... 3. Select a virtual machine and right click selecting Open Console 4. Login to the virtual machine with administrative rights 5. Click Start and the right click on Computer selecting Manage 6. Select Disk Management 7. Select the disk to be change and right click selecting Extend Volume 8. Click Next 9. Click Next 10. Click Finish 11. Close the window and logoff the machine Source : http://www.virtualwood.co.uk/?p=415
Source : http://www.clubic.com/forum/microsoft-windows/windows-7-ordinateur-gerer-ne-fonctionne-pas-id671852-page1.html
Source : http://myvirtualcloud.net/?p=1222 Un résumé : 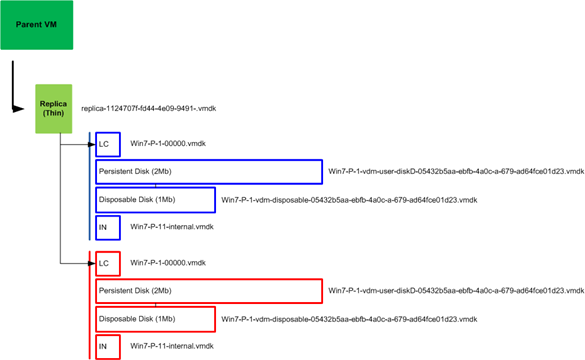
To restart a vCenter Server service: Note : redémarrer uniquement le service view composer ne cause pas de pb Note : rebooter vcenter-view ne cause pas de déconnexion Source : http://kb.vmware.com/selfservice/microsites/search.do?language=en_US&cmd=displayKC&externalId=1003895
Ce service logiciel agit comme un broker pour les connexions client. View Connection Server authentifie les utilisateurs via Windows Active Directory et dirige la demande vers la machine virtuelle appropriée, le PC physique ou lame, ou le serveur Windows Terminal Services. Source : http://pubs.vmware.com/view-50/index.jsp?topic=/com.vmware.view.planning.doc/GUID-6CAFE558-A0AB-4894-A0F4-97CF556784A9.html
This does explain what happens when reset the desktop! It just resets the Virtual Machine without shutting down the operating system properly like it does when clicking the reset option in the vCenter. The user session will be disconnected and all unsaved work will be lost. Sur un vrai système, cela correspondrait à éteindre brutalement le système. With this function the Administrator can change the snapshot within the parent VM or he can change to another parent VM. In both cases a new Replica image will be provisioned to all LUNs configured with the pool. During the refresh the snapshot or parent VM isnt changed. This action does only reset the delta disk to its initial state, to the source. This is be done to reduce the amount of storage used by the VM. During this action all virtual machines will be rebalanced between the LUNs to use the space efficiently. Source : http://www.thatsmyview.net/2009/07/07/reset-refresh-recompose-rebalance/ |

| Dernières modifs |
|---|
| VMware Workstation (November 7th, 2020) Gestion d'une infra vSphere 5 (October 18th, 2016) From 5.0 to 5.5 (October 18th, 2016) Analyse des perfs et tuning (October 18th, 2016) Debian (October 18th, 2016) Pools (October 18th, 2016) Veeam (October 18th, 2016) |
| Contact | ||
|---|---|---|
| Pour m'envoyer un mail, Pour me laisser un commentaire :
|